
Photography subjects are all around us. When you are a beginner, sometimes it can actually be overwhelming to decide what to start photographing. I, of course, focus on nature and wildlife photography. One of my favorite wildlife subjects is birds. I enjoy learning about them, the challenge of photographing them, and teaching others about them. In this Quick Tips blog, I will give some tips on getting started photographing our feathered friends.
There are many benefits of learning how to photograph birds. A few include
How to Get Started
Begin by learning some basics about your subject. Knowing basic behaviors and characteristics will help you appreciate your subject more and help you to identify, locate, and photograph them.
Identification Help
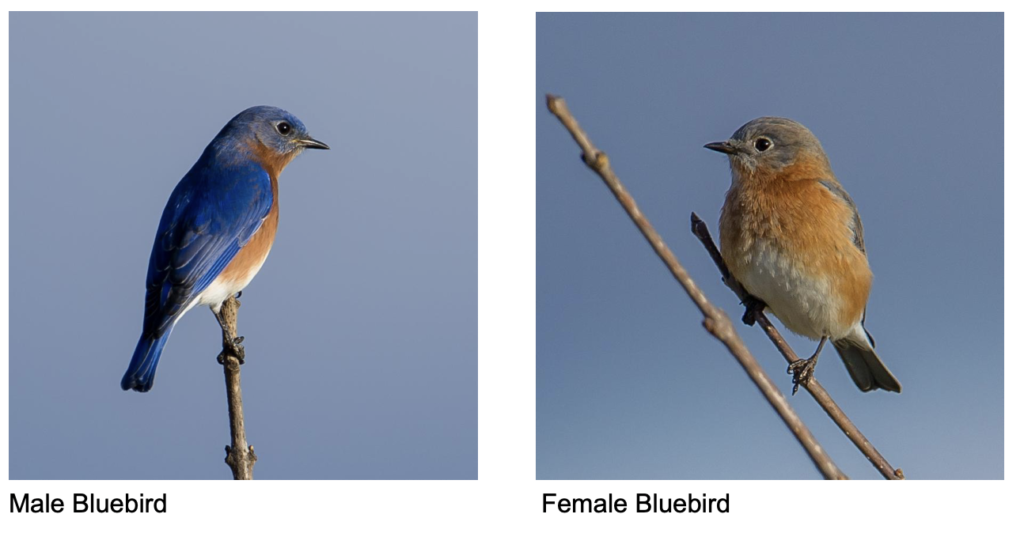
Local year-round birds are easiest to start identifying and photographing. Migrating birds are fairly predictable, so you can learn the times of the year that various birds migrate through your area. Male birds are usually more easily identified because they are more colorful and vocal. Females and young males can look very similar.
There are many great tools available to begin identifying birds and to learn more about them. The Cornell Lab Merlin app is a free tool that I highly recommend. A good bird guide book is another excellent resource. Many are available including ones by Peterson, Sibley, Audubon, and National Geographic. As you become more involved in bird photography, you may also enjoy joining a birding and/or photography club or group. Research your area for Ornithological Societies, Camera Clubs, and Birding Social Media Groups.
Basic Behaviors
Learning basic behaviors such as what birds eat and their preferred habitats will help you draw them to your yard, know where to look for them on location, predict their behavior, and get better photos. Backyard bird feeders will attract different birds based on the types of feed and seed that you use. To attract many different birds, use a variety of seeds and use suet for woodpeckers. Consider planting trees, shrubs, and flowers to attract birds. Hummingbirds, for example, will be drawn to nectar producing flowers. While other types of birds will eat the seeds produced by flowering plants. All birds will benefit from having cover and nesting places in backyard plantings.
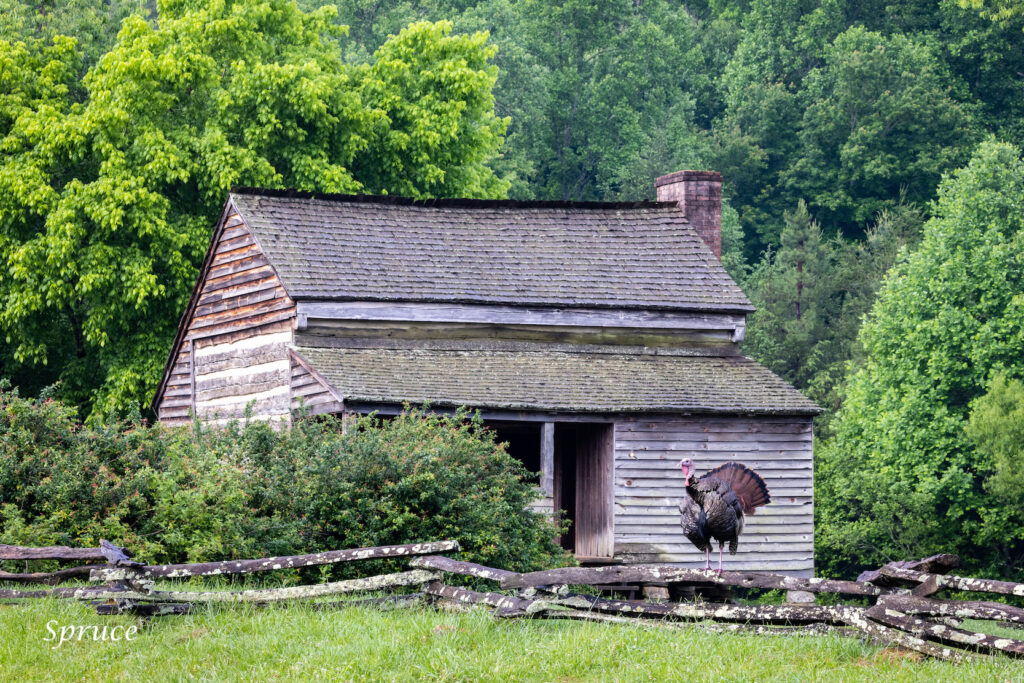
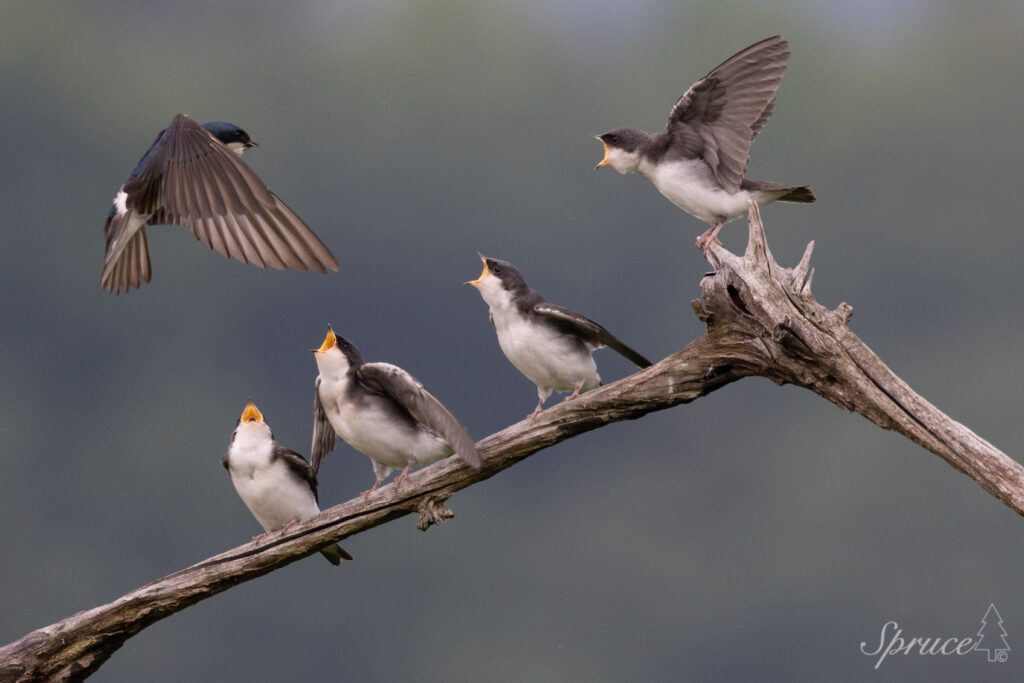
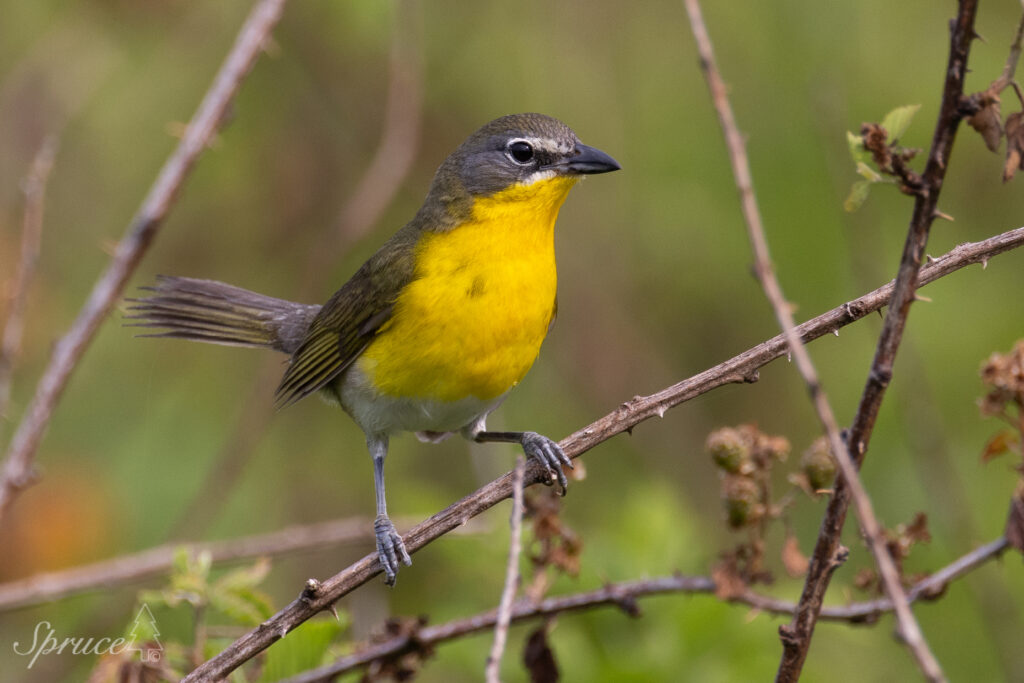
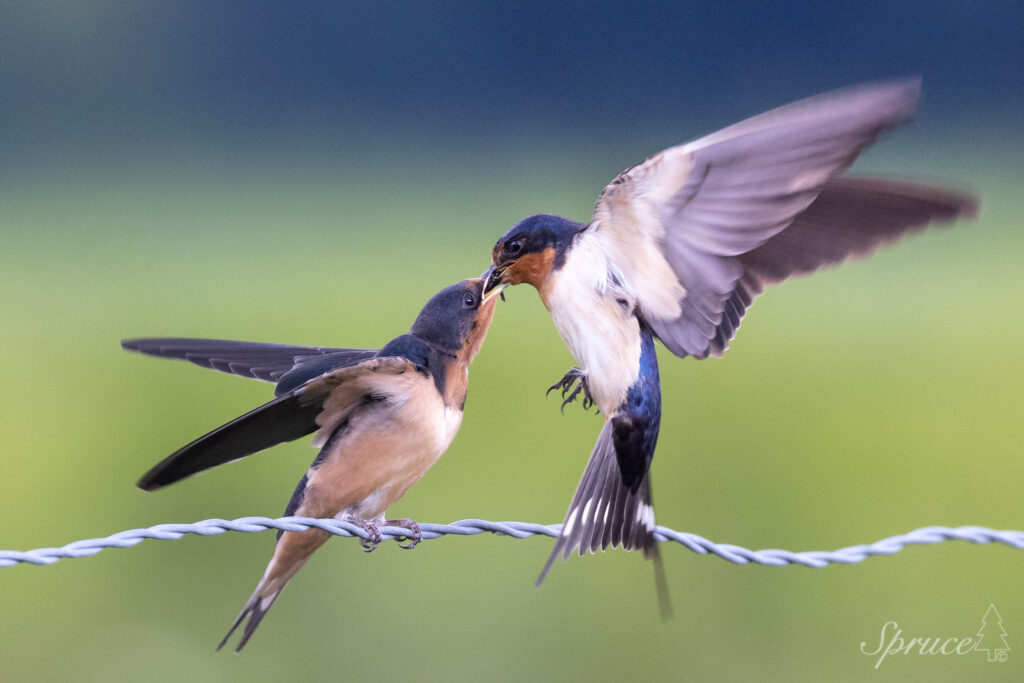
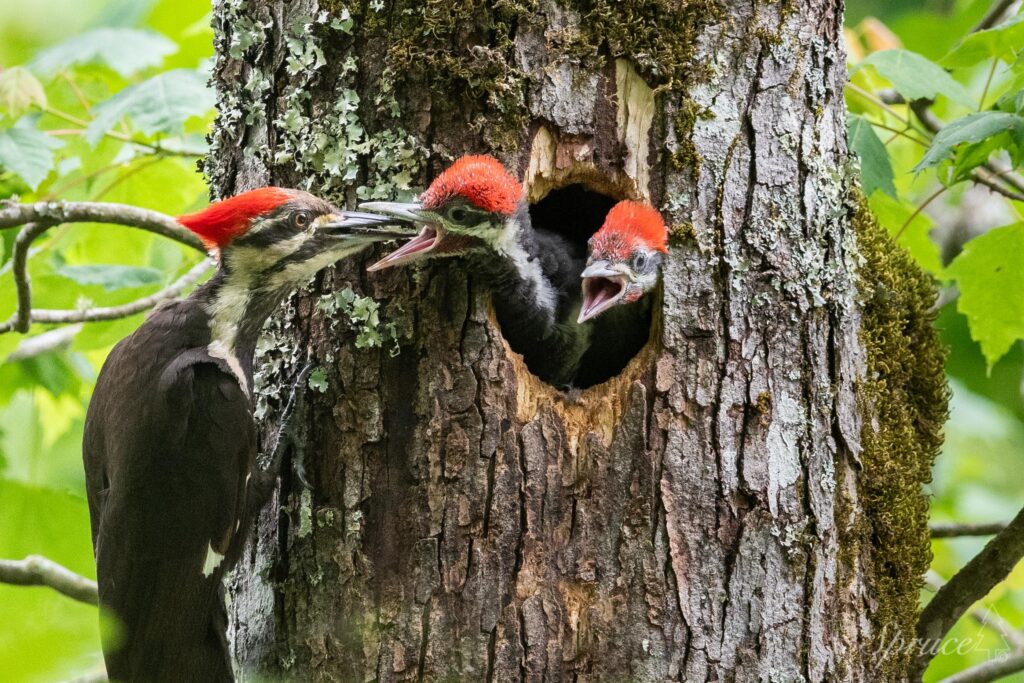
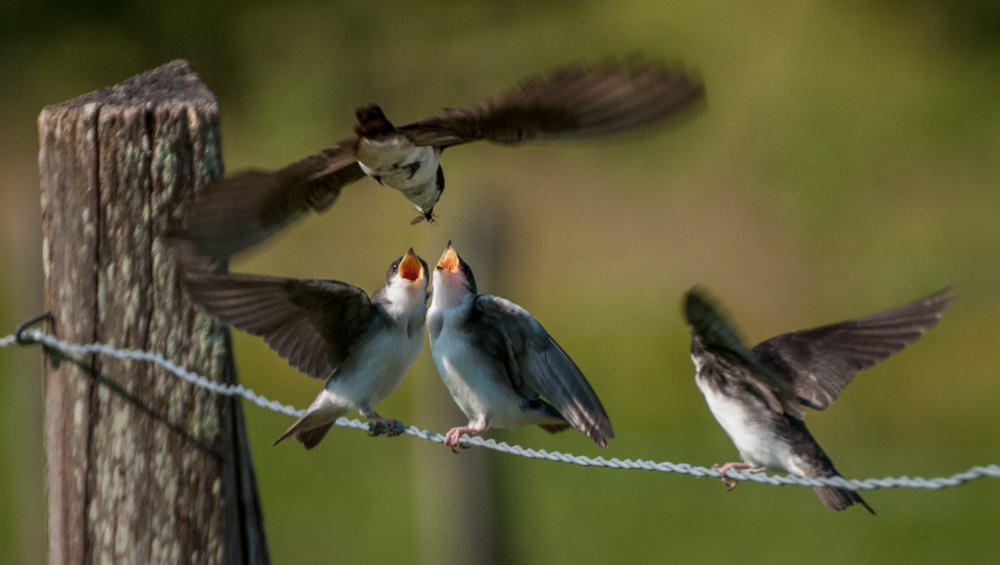
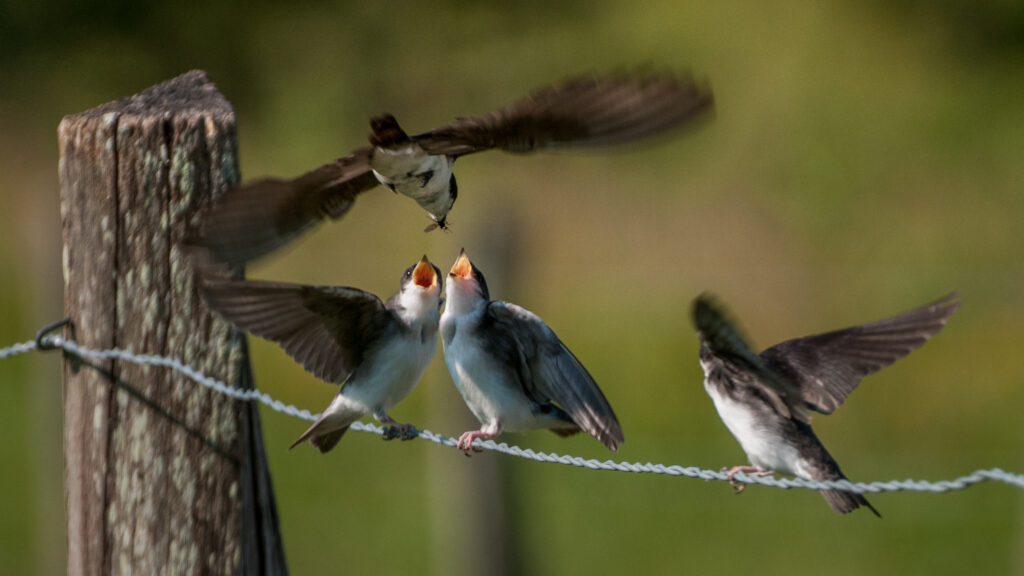
Some birds will feed predominantly on insects, and you can use this knowledge to get photographs of them catching a meal in flight or delivering an insect to their young as in the image below.
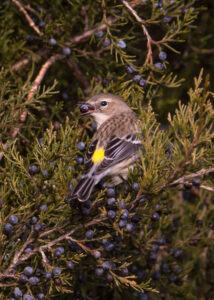
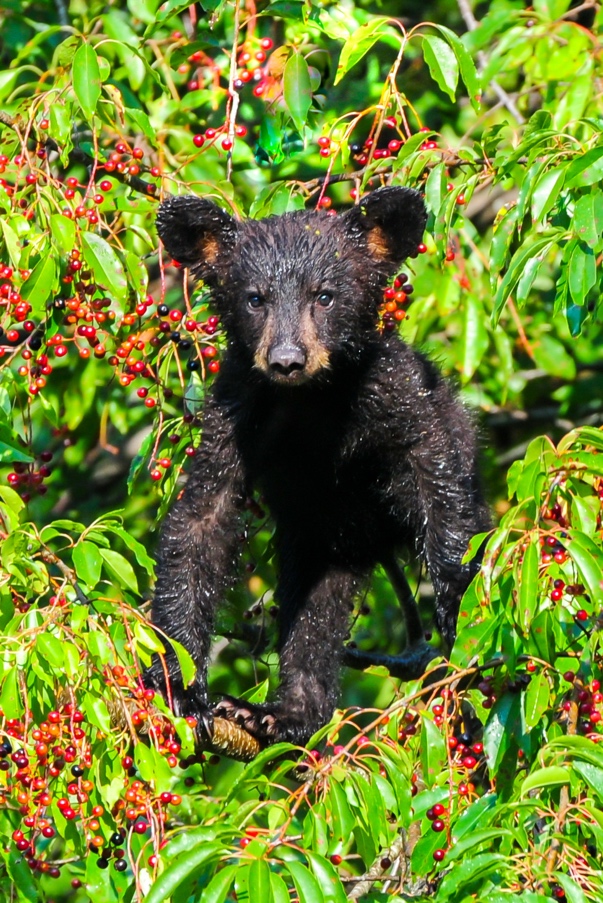
Other birds that feed on berries will be found in trees and shrubs. So, looking for likely food sources can result in great photos of them eating colorful berries.
Gear to Get Started
As you get started photographing birds, you will need some basic gear. A good pair of binoculars tops the list of recommended gear. There are many brands available. Look for good quality 8×42 binoculars. Binoculars will help you find and identify the birds that you want to photograph.
As with binoculars there are many camera brands available. Look for a digital (DSLR) camera from a respected manufacturer such as Canon, Nikon, Sony, Fuji, Panasonic. You will want a camera and lenses with vibration reduction (VR) and image stabilization (IS) capabilities. A good birding lens would be a 200mm or higher. Zooms are very versatile and can be used, also. Other equipment that will be handy is a tripod and a monopod with a Gimbal tripod head.
Photographing
Bird photography is fun and challenging. You are frequently photographing a moving subject that at times is quite small and in variable lighting. Below are some tips to follow as you practice photographing birds. Keep in mind that the key to progress is practice. Since birds are in nearly every environment, you can practice regularly even if it is in your backyard or a nearby city park. As you practice, the techniques become habit, and as you adventure into different settings to photograph birds your results will be better and better.
Photography Tips:
In conclusion, learning bird photography is a fun and challenging hobby that anyone can get started doing. Download a bird app such as Merlin by Cornel Lab to your phone and begin identifying the birds in your neighborhood. Improve your yard with feeders and simple plantings to encourage birds, and you will be able to easily practice your photography in your backyard. Get started with some basic camera gear and binoculars. Soon you will find yourself enjoying your bird photography as much as I do.
Have you ever looked at an image that grabbed your attention and held your interest as you gazed at it? Did you wonder how the artist went about creating that visual experience? There is a good chance that some basic rules of composition were used in creating the image. In addition to knowing how to use your camera, learning a few basic composition techniques will greatly improve your images. We will cover 4 quick tips to improve composition in your photography:
The “rule of thirds” refers to dividing an image into thirds horizontally and vertically. Placing subjects or strong lines of an image at the intersection points of the lines or along the lines themselves creates a balanced, visually pleasing composition.
Compare the two images below. In the first image, you will notice that the subject is placed according to the rule of thirds. Also, the lines of the rocks and mountains are roughly dividing the image into thirds. In the second image, the subject is more centered. The first image is more visually pleasing and has a more dramatic feel.


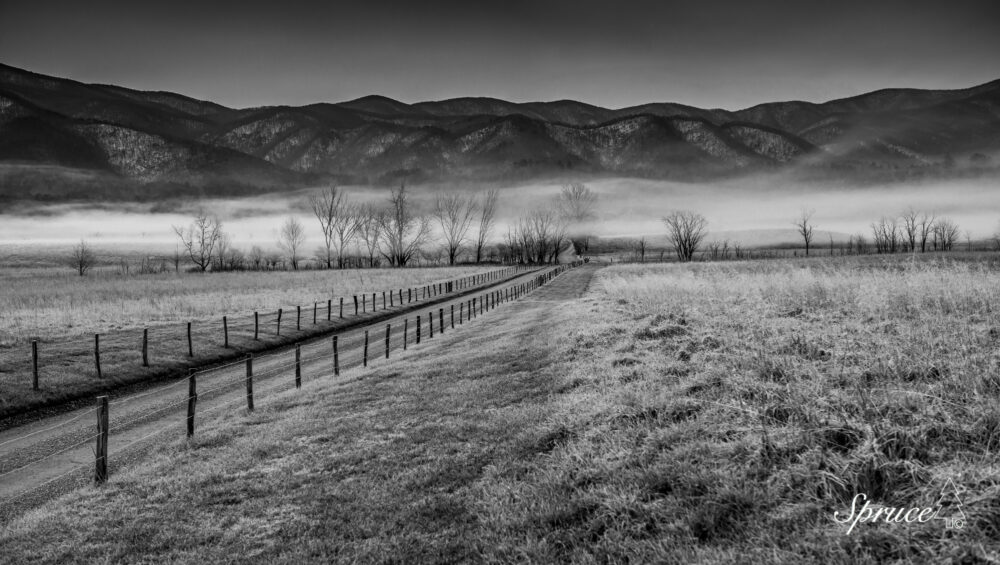
Leading lines are lines in an image that lead the viewer’s eyes from one part of the image to another. Frequently the line or lines will lead towards the main subject or focal point of the image. Leading lines in landscape photography add depth and perspective to an image making a scene more three dimensional.
In this black and white image of Hyatt Lane in Cades Cove, notice how the leading lines of the fence and the road lead you into the field towards the mountains. The leading lines draw your eyes into the image creating a sense of depth and perspective. Also, note how the rule of thirds is utilized in the scene.

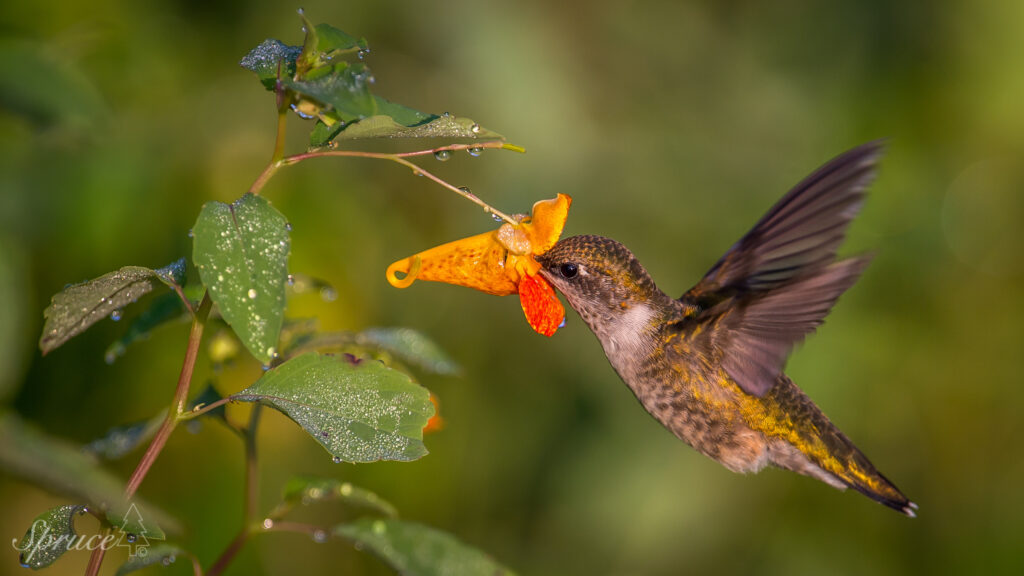
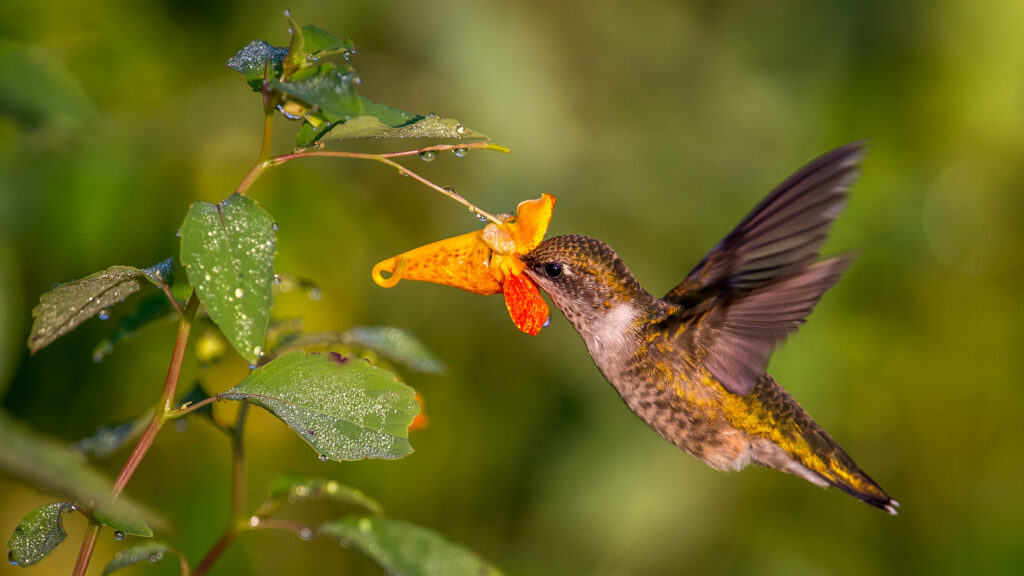
Bokeh refers to the out-of-focus areas of an image. Bokeh can be used to create a pleasing background effect for subjects. It can result in an image where the subject appears to pop off the page. The basic technique for creating bokeh is to be as close to the subject as possible with the background at a significant distance and shoot with a shallow depth of field (large aperture). It is also important to pay attention to the colors, highlights, and shadows of the background to ensure optimal placement of the subject.
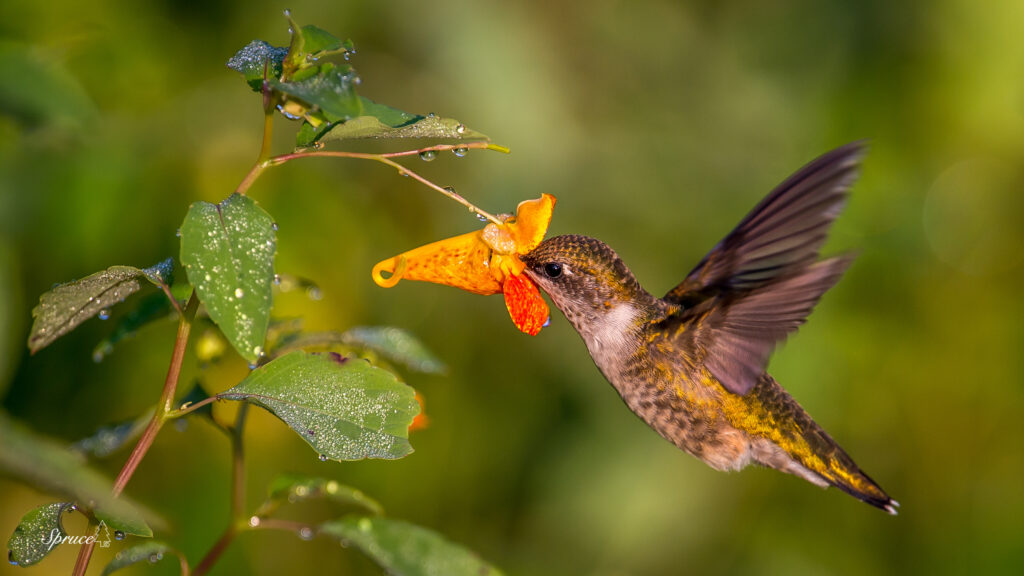
Notice how in this image of a ruby-throated hummingbird sipping nectar from a jewelweed blossom the background is blurred creating a soft, complementing background to the bird. The bird and flower appear almost 3-D.
Natural framing is when an element within the image such as tree branches or an architectural element frame the subject of the image. This draws the viewer’s eyes into the photo and serves to highlight the subject. Natural framing creates a strong composition emphasizing the subject.
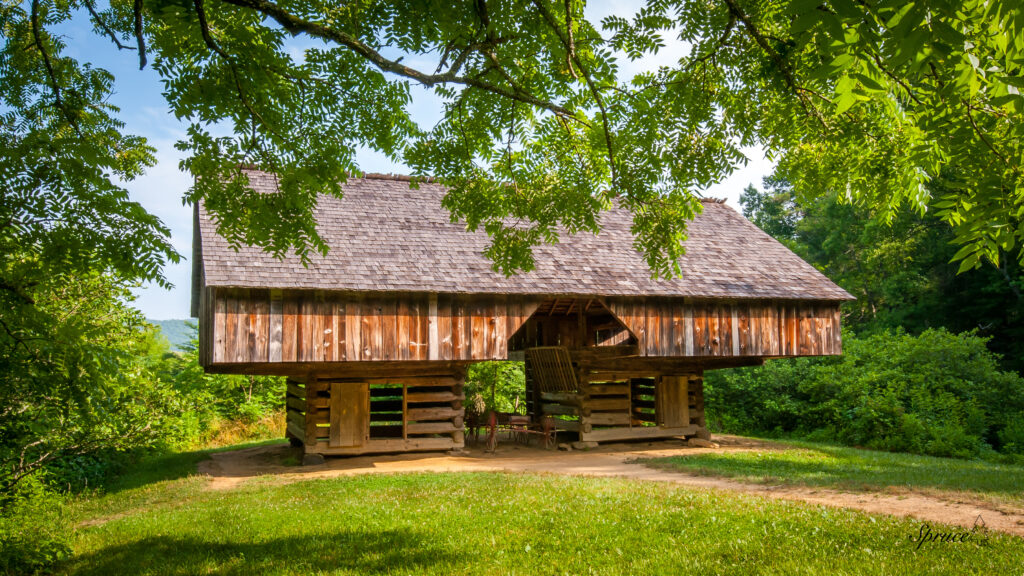
In this barn image of the cantilever barn in Cades Cove, notice how the walnut tree in the foreground is used to frame the subject. The eyes are drawn into the center focal point of the picture.
Lastly, keep in mind when composing your photographs in the field to leave room in your image for later cropping during post processing. When reviewing your images, you often will see a way to compose an image that you did not see when shooting it. So having room in the image to crop it will be important. With a little practice these compositional techniques will become second nature when you are viewing a scene and will improve your photography.
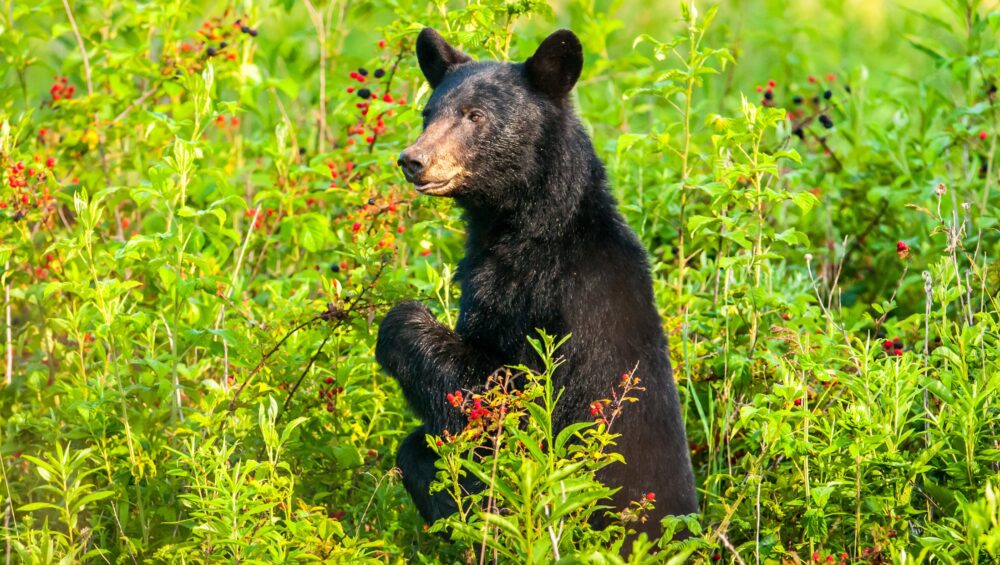
The American Black Bear is the iconic inhabitant of the Great Smoky Mountains. No visit is complete without picking-up a bear souvenir and trying to site one while driving a scenic byway. But have you ever wondered what the bears are doing while you are looking for them? Most likely, if they are not sleeping, they are busy foraging for food. This is particularly true for female bears who are nursing their cubs.
So, what are they eating out there in the woods and fields of the Smokies? Black bears are omnivorous, meaning that they are opportunistic feeders who will eat a variety of things, including vegetation and meat. In the Spring when food is scarce, bears may eat grasses, inner tree bark, insects, and insect larvae. They will tear apart rotting logs and overturn rocks looking for invertebrates. Bears will also feed on carrion that they come across. They will follow the food sources that become available throughout the year such as blackberries, cherries, acorns, and walnuts.
Black Bears are the smallest North American bear, but they have the keenest noses in the park. Bears rely on their sense of smell for finding food. It is thought that they can smell a food source over two miles away! Because of this it is always important to follow proper food storage protocols when hiking and camping to help minimize human and bear interactions.
While you enjoy your visit to the Great Smoky Mountains, don’t forget to respect the wildlife and the wilderness around you. Bears and the other inhabitants of the area are wild animals and approaching them is dangerous for both humans and the animals. Photographs and videos in this article were taken with appropriate telephoto/zoom lenses while maintaining a safe distance from the subject.
Video of black bear digging up a yellow jacket nest to eat the larvae.
References:
https://www.nps.gov/articles/000/american-black-bear.htm
http://www.bearconservation.org.uk/eastern-black-bear/
https://www.nwf.org/Educational-Resources/Wildlife-Guide/Mammals/black-bear
https://www.chesapeakebay.net/discover/field-guide/entry/american-black-bear
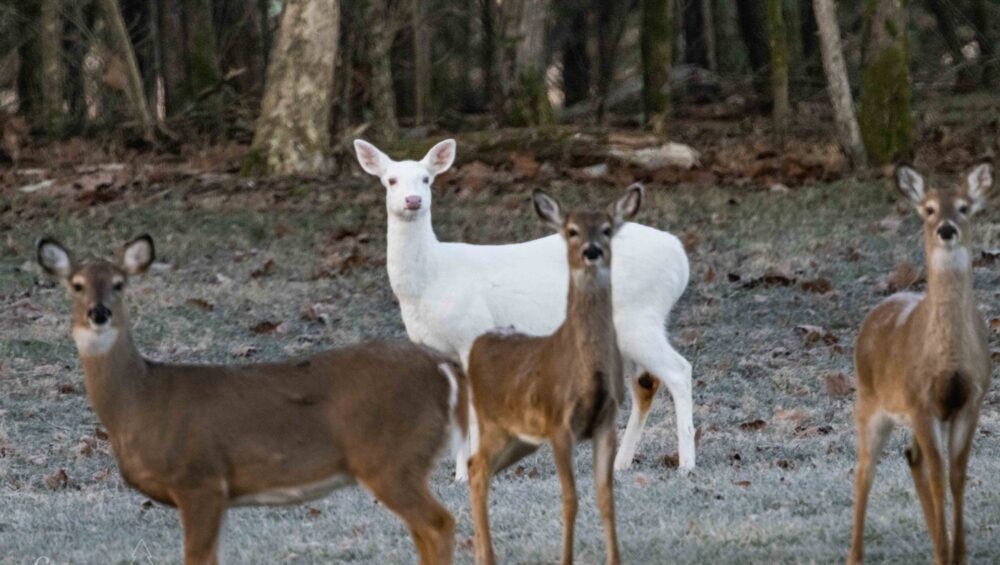
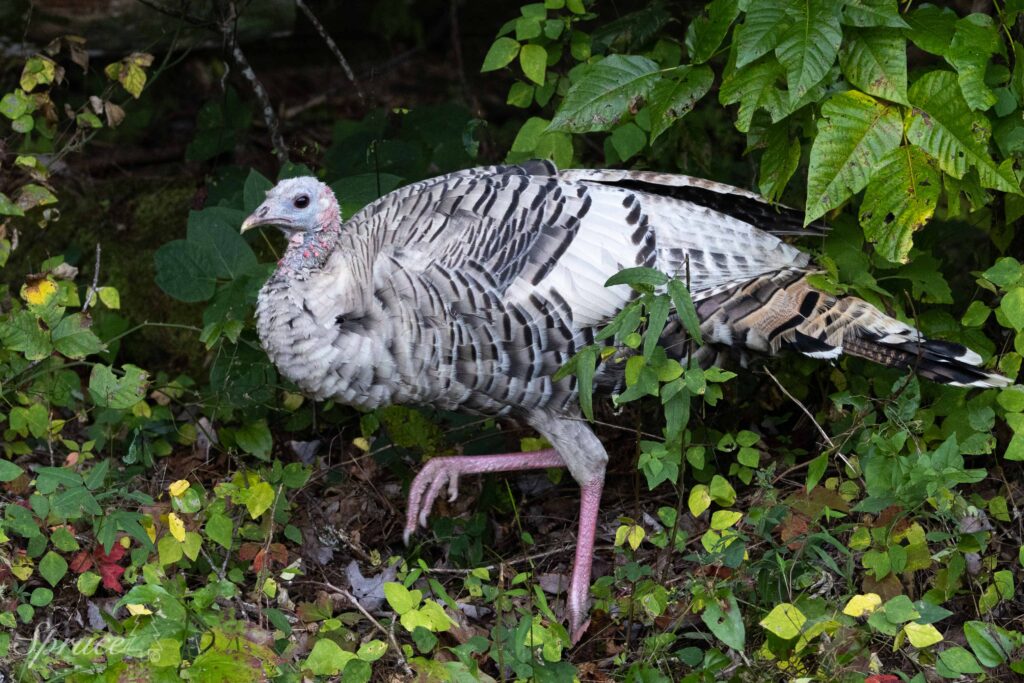
If you are lucky, you may one day see an animal or bird lacking pigment in fur or feathers. A loss of pigmentation caused by a genetic mutation that interferes with the production of melanin is called albinism. Melanin produced in an animal’s body is the main pigment that determines skin, fur, and eye color. A true albino animal will typically have pink eyes. Albino animals are rare in the wild. They do not survive very long due to their conspicuous color and poor eyesight. Other forms of partial pigmentation loss such as leucism occurs more frequently.
Leucism does not completely eliminate pigment and can result in a variety of patterns. Leucistic animals will have some pigment in their fur, eyes, feathers, etc. A leucistic deer can vary greatly. In some instances, they may have some white splotches. In other cases, they may be half brown and half white or nearly all white. Piebald is a term used for mixed brown and white animals. Leucism in deer is a recessive genetic trait found in about 1% of the population.
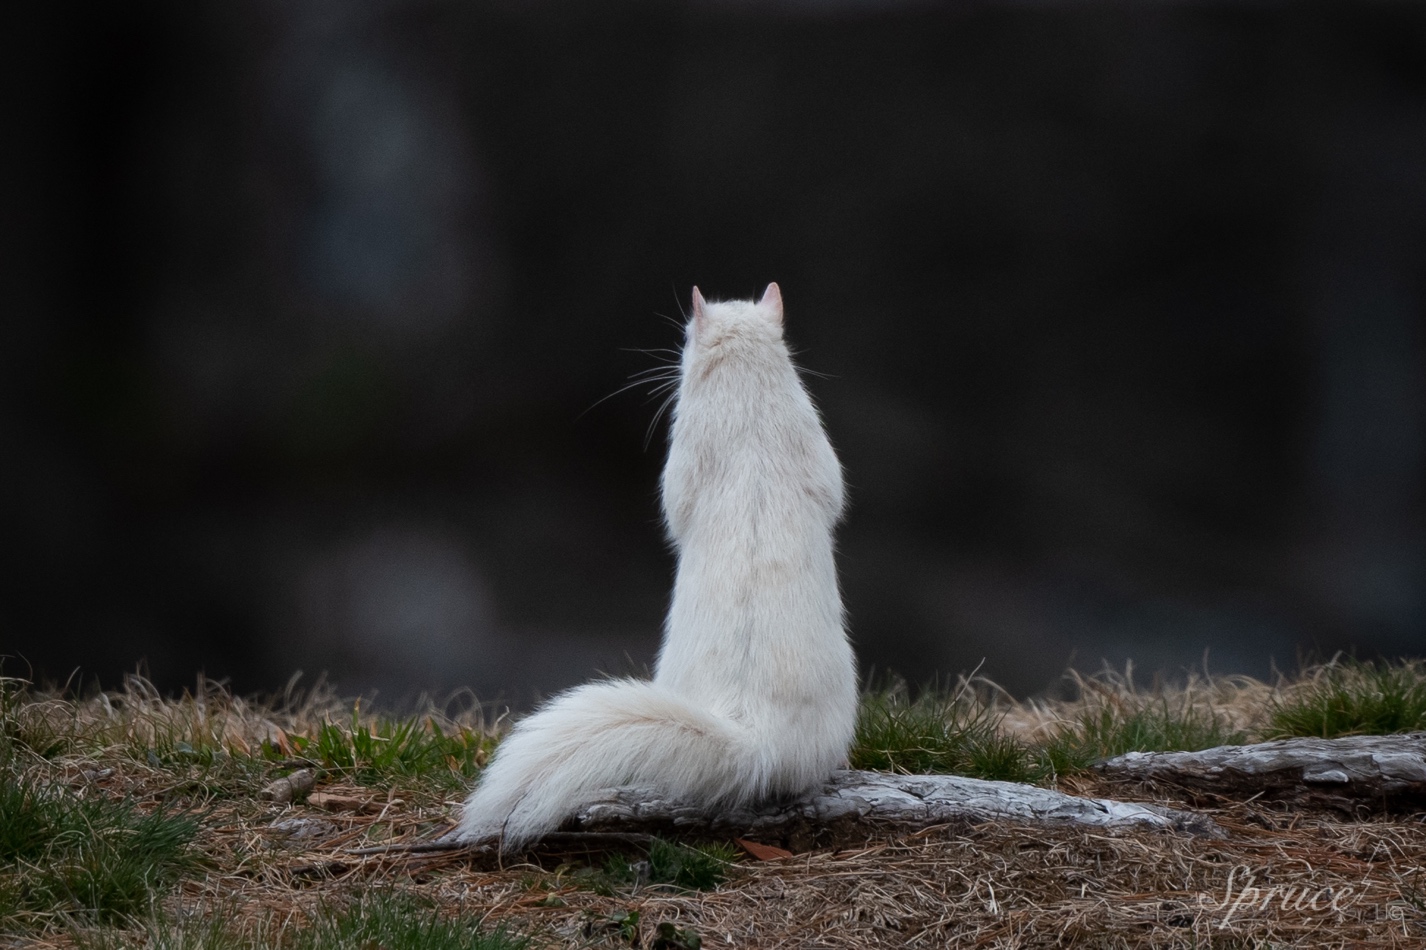
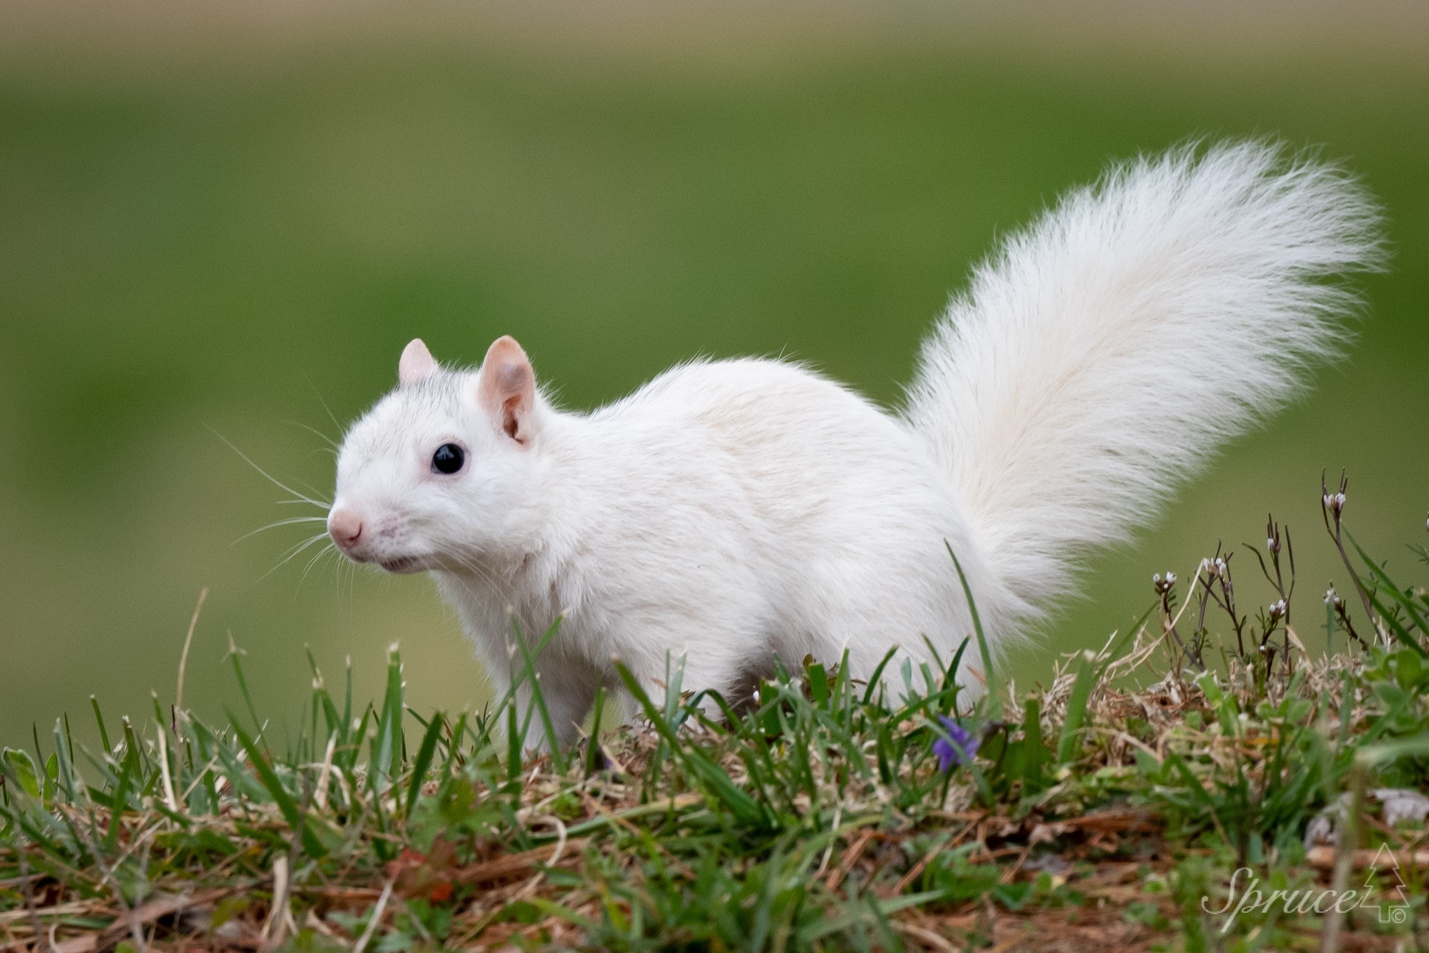
Leucistic Squirrel
White leucistic squirrels are a tourist attraction in several U.S. cities. As with other animals, fur color in squirrels varies widely, and true albinos are rare. Even though most white squirrels are leucistic, the town of Olney, Illinois has a colony of albino squirrels. Approximately 12% of Olney’s squirrels are true albinos.
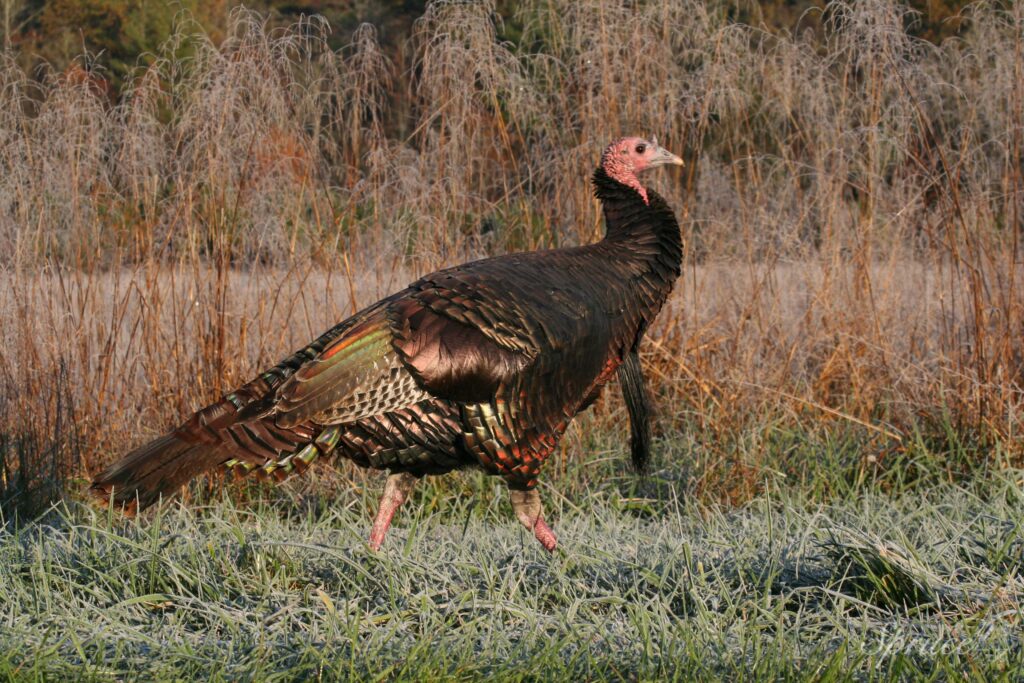
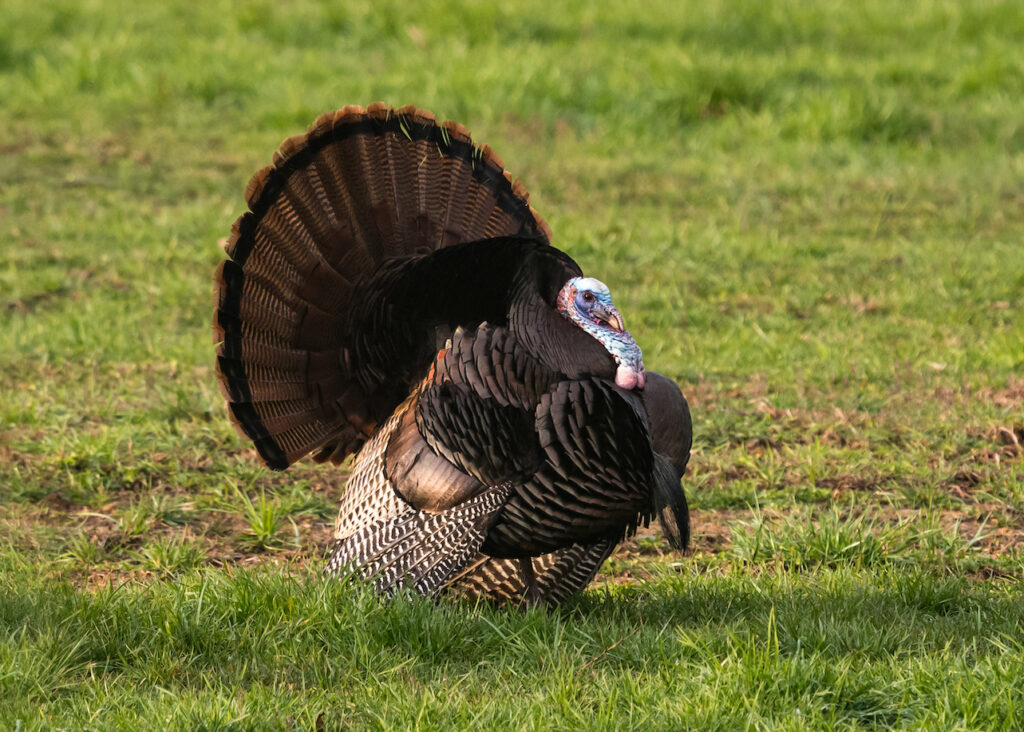
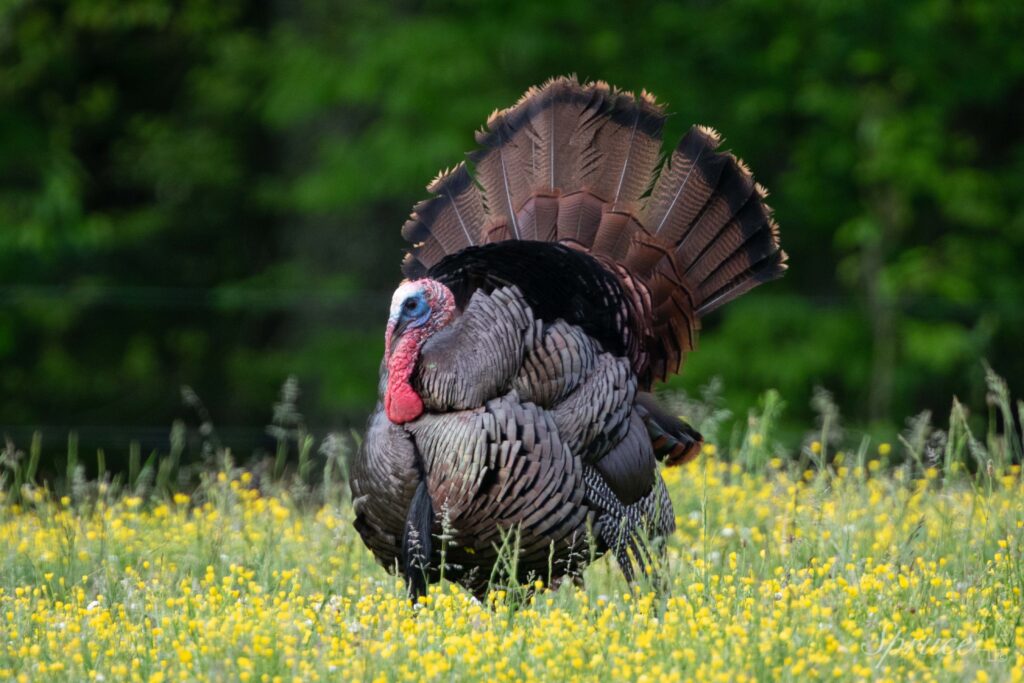
Leucistic and albino turkeys are also observed in the wild. There are several different color phases of turkey, such as the smoke-phase, which is much more common than leucistic or albino. The smoke-phase has a significant lack of brown pigments, and appears more gray or smoky looking. The majority (approximately 95%) of smoke-phase turkeys are hens.
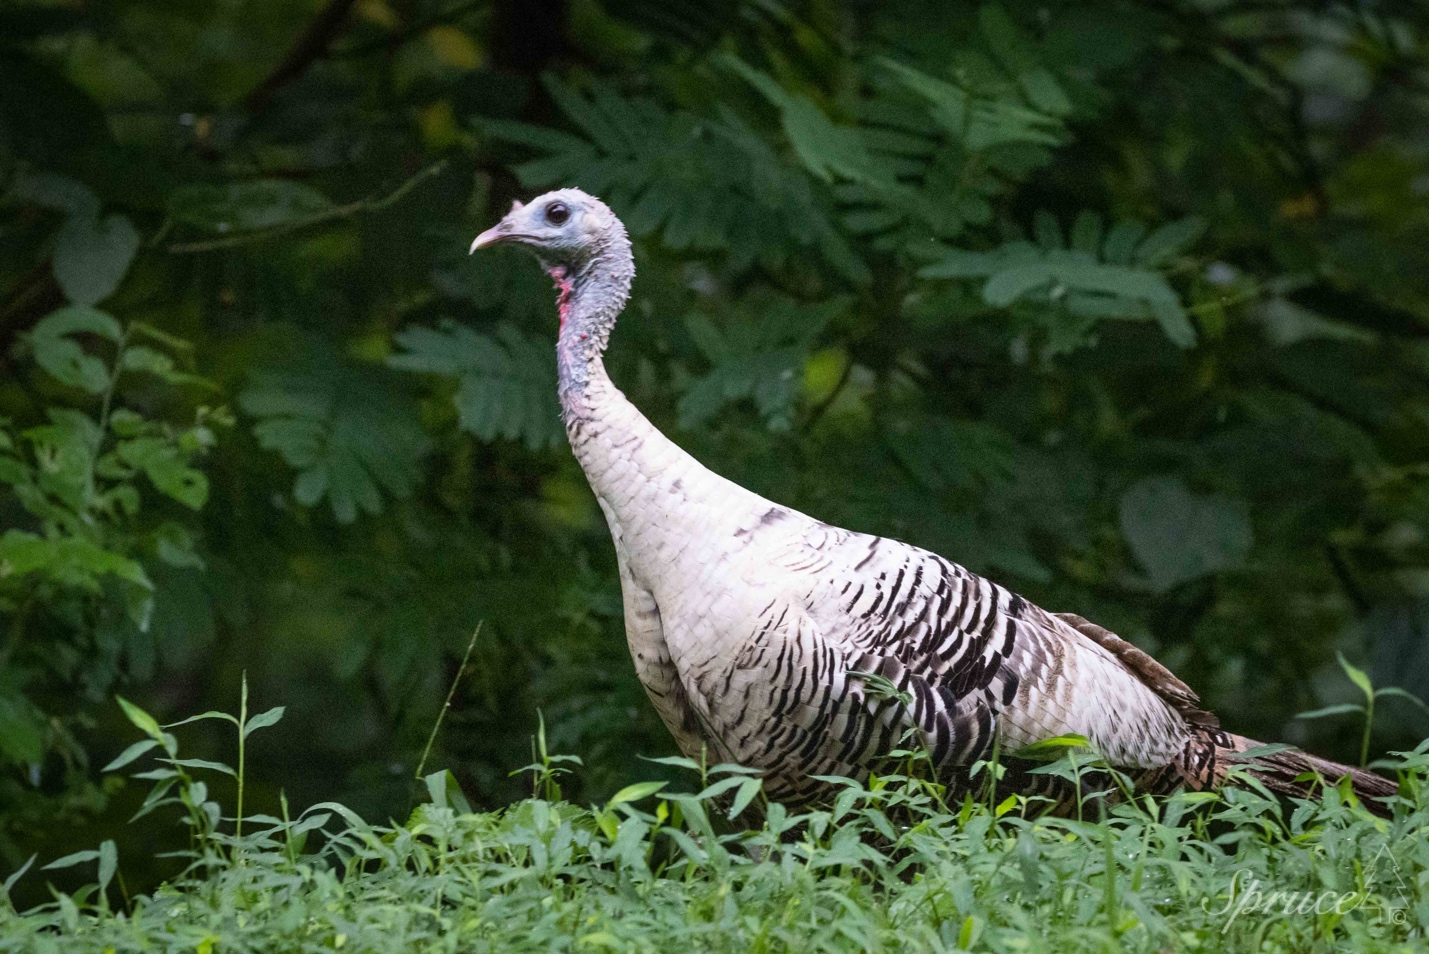
Smoke-Phase Turkey Hen
Regardless of the cause of a rare color variation in nature, it is always an exhilarating experience when one has the opportunity to photograph it.
References:
https://www.nationalgeographic.com/animals/article/albino-animals
https://www.birdsandblooms.com/birding/birding-basics/albinism-in-birds/
https://www.wideopenspaces.com/white-wild-turkey/
https://blog.nature.org/science/2021/10/11/whats-up-with-white-squirrels-and-black-squirrels/
The Piping Plover population of the USA has been in trouble for a long time now. Thankfully conservation actions were started to protect the beaches along the Atlantic coast where they breed. There has been a slight boost in the population (numbers now range in the 5-10 thousand) in recent years as a result of these actions of conservation. Their breeding range is from south Newfoundland to northern South Carolina along the Atlantic coastline. There is also a small population in the midwest, south and west of the great lakes.
The Piping Plover gets its name from the bell like whistles used in its call and is often heard before it is seen. The adult is about 7 inches long and has a bright yellow beak as well as yellow legs. Despite that bright coloration, they blend in remarkably well to their beach habitat. They can stand still for long periods of time and then suddenly run for a burst 20-30 feet before stopping motionless again. They feed on small insects and vertebrae found on the beaches. Piping Plover are often found breeding on the same beaches as breeding Least Terns. I will be posting the terns in future posts.
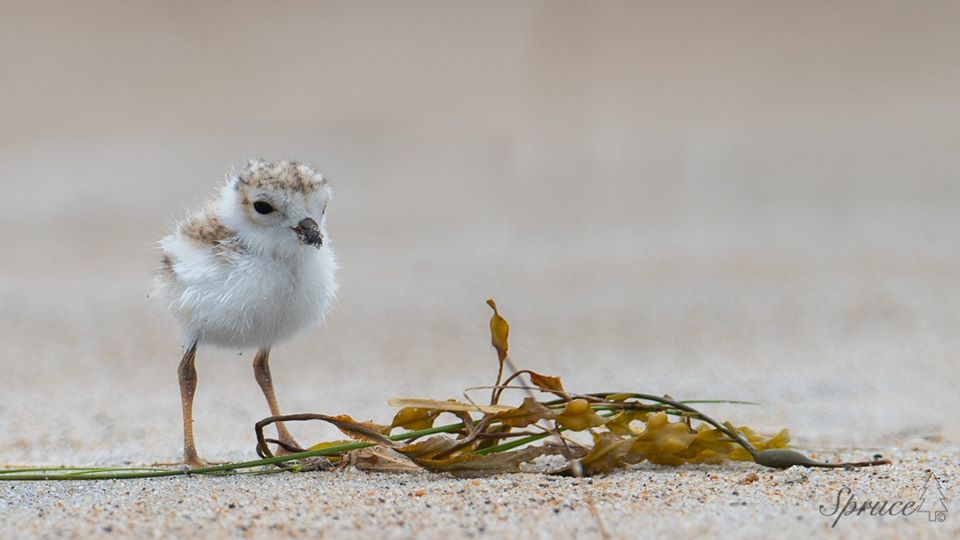
They winter in the Caribbean and US Gulf shoreline from September-March and breed April-August along the Atlantic shoreline. They can have several broods, and the 1st one in May usually produces 3-4 chicks with subsequent broods producing less. The chicks have to forage for their own food, and they do so as early as 1 hour after birth. This chick included in the post is only days old and about 2″ long. I included the seaweed in the image to show the details of its small size at such a tender young age. The images were taken on the last day of June. I witnessed a few 3 chick families but mostly 2 chick families at this location.
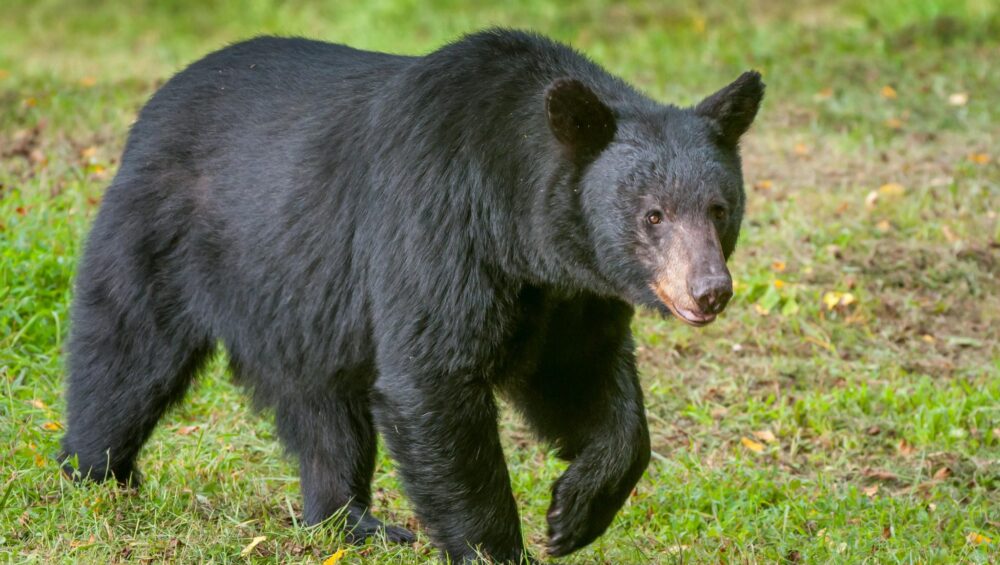
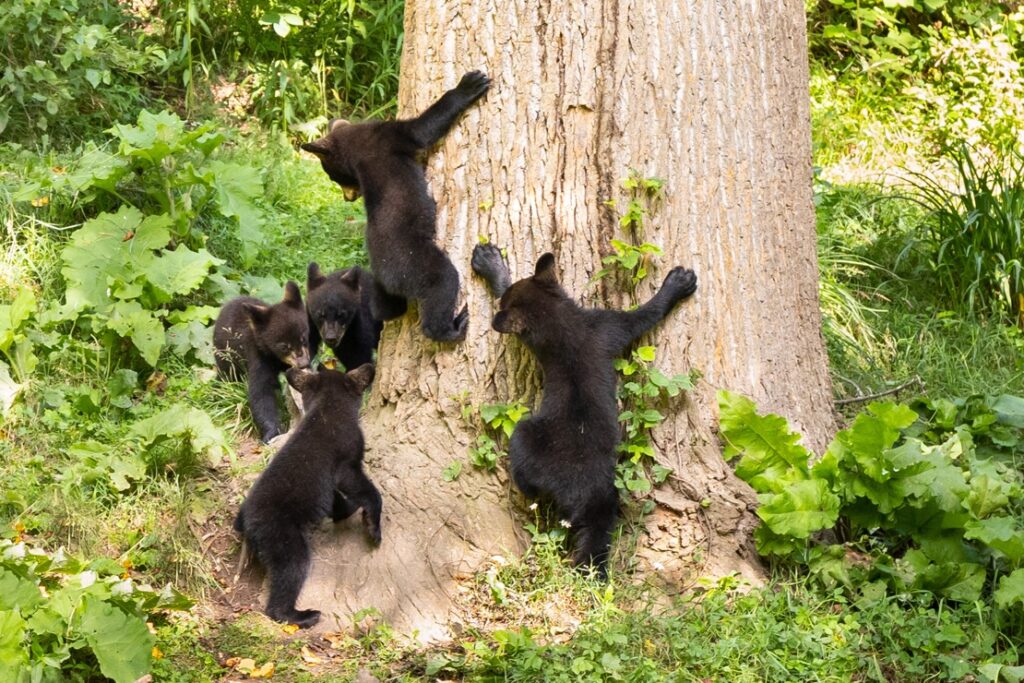
Smoky Mountain Black Bears males average around 250 pounds while females are just over 100 pounds. This is an extreme difference and can sometimes be used to tell the sex of a mature bear. Some other physical appearance differences are the shape and size of the head and its parts. Adult females tend to show a more elongated face (more dog like) and longer taller ears. An adult male’s head and face has more round like features, and their ears have a more squatty appearance. Both males and females can run up to 25-30mph if they have to. They are extremely strong and able to lift 300 lbs. with a single lift of a front forearm. What is more amazing is the dexterity they have along with that strength. They are able to use their paws and claws to do the smallest and most difficult precise movements when foraging and feeding. They hear and see better than humans, but their most amazing sense is smell. They can smell 7x better than a domestic dog. Females can breed as early as 3 years old, and American Black Bears live on average to be 18 years old in the wild.
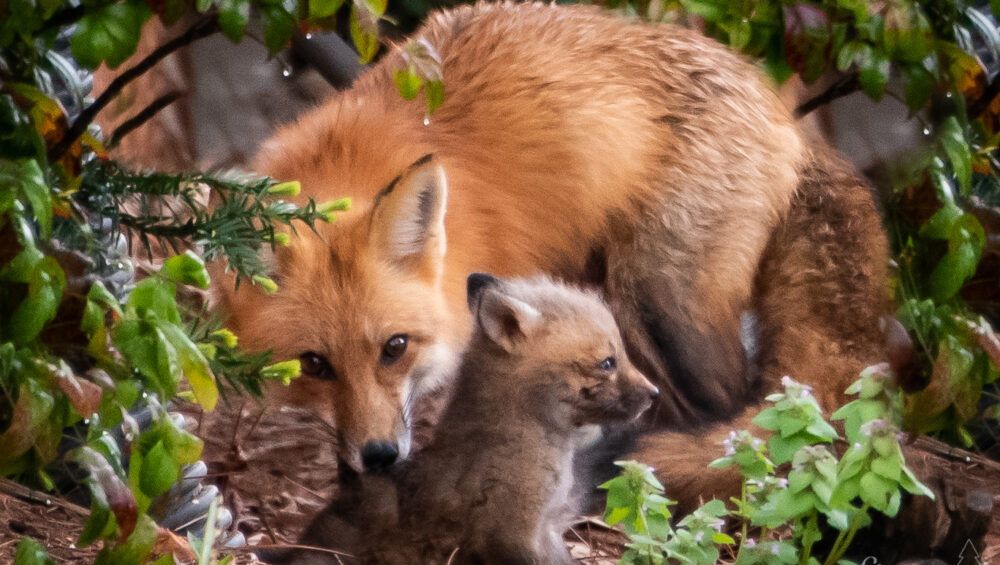
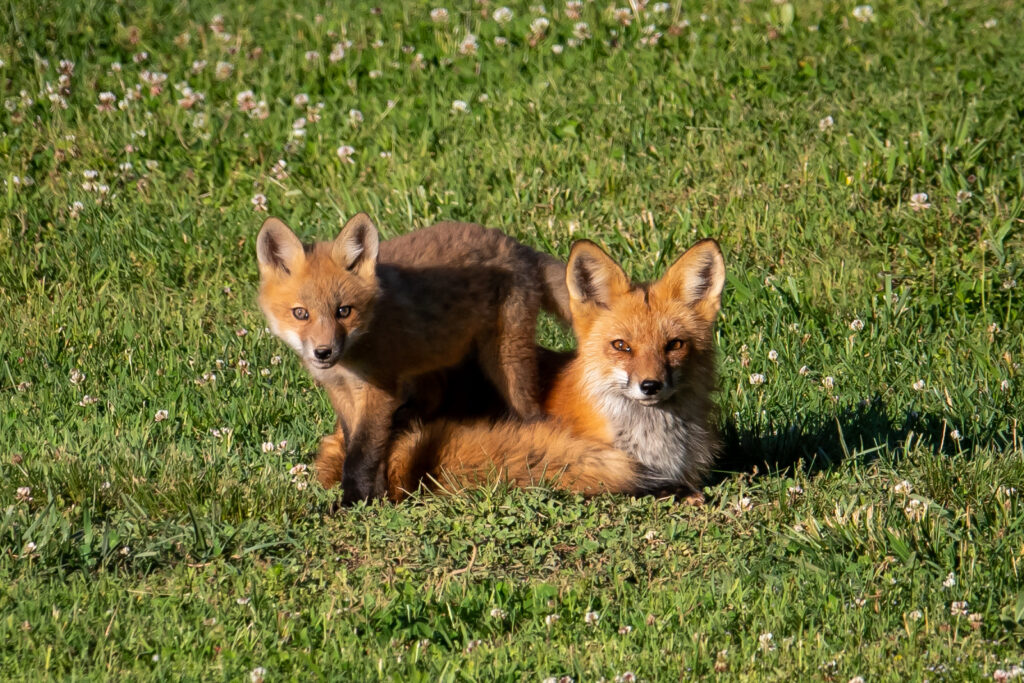
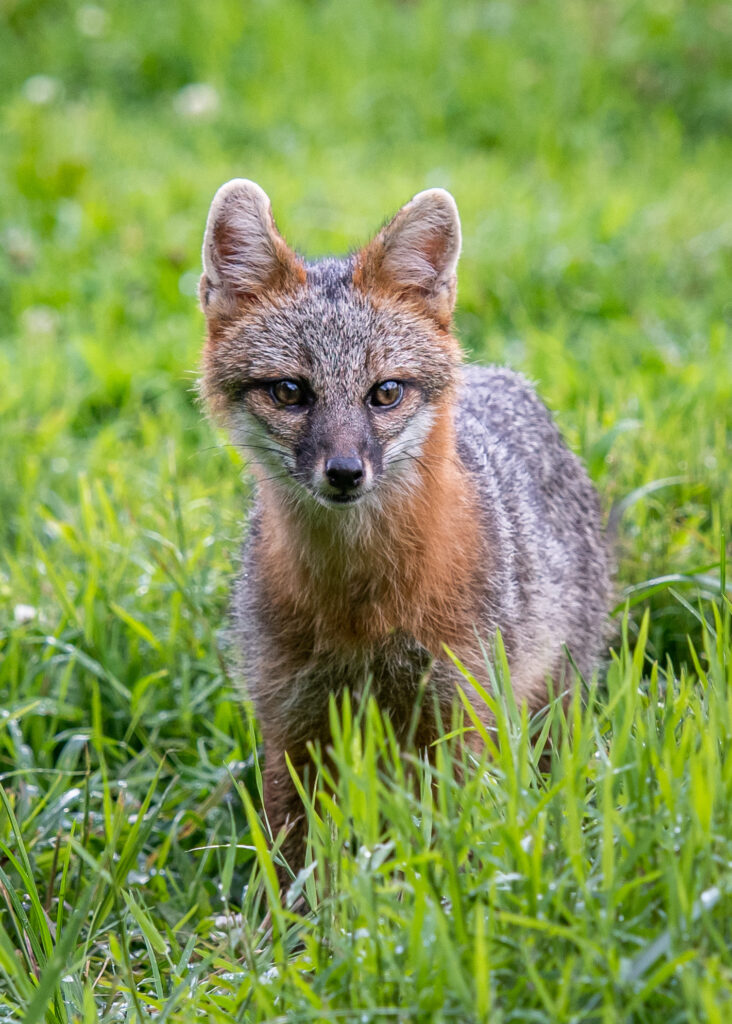
Today’s post is on the Red Fox. Hopefully between description and photos when you are done reading my blog you will have a better understanding of the differences between the Red Fox and Gray Fox. The two foxes are distant cousins to each other. Both are common to the US with the Gray Fox being the dominant fox West of the Mississippi and the Red Fox the dominant fox East of the Mississippi.
The Red Fox is only slightly larger than the Gray Fox. Its overall color is an orange brown and the tip of its tail is white. Different to other foxes it has black legs called stockings.
It is also different than the Gray Fox because of where it lives. The Red Fox has only a small presence in the actual territory of the Great Smoky Mountain National Park. Fearful of another canine, the Coyote, it chooses to rather live in outlying areas buffering the heavily wooded national park. It can be found in towns and even cities which have greenbelt areas and county parks. It also enjoys living around golf courses and country clubs. Those locations are surrounded by wooded areas in which they hunt and the grassy fairways are like their highways to get from one hunting ground to another.
Because they do live in close proximity to humans, Red Foxes may be seen when they are moving from one area to another. They are seen even more in late winter and early Spring when males are searching for females. Females and kits are seen frequently in late spring. One of the reasons for this is that female Red Fox have to hunt and provide for their kits. They also have a tendency to move their kits from one den site to another. Sometimes the first spot is very small or very close to human activity. As the kits grow more space and privacy may be required, so she moves them during the night time hours. If this occurs she will move one kit at a time until the whole family is secure in the new location. Red Fox usually have 1-7 kits sometimes called cubs. It is common for a female to have a litter of 4 or 5.